by Amanda Rose Newton
Vermicomposting, also known as worm composting, is an easy way to speed up the composting process we discussed last week. Even better, this is a technique that is adaptable for almost any living space, whether you occupy a house or a studio apartment!
Vermicomposting Basics
With regular composting, dry and moist materials come together and decompose over time, freeing up valuable nutrients happily taken up by plants. When you layer your compost components and add worms to the mix, their feeding activity puts this process in the fast lane and greatly reduces compost time from start to finish. You might have seen worm castings for sale (and usually not for cheap, either) which is essentially worm manure. Like all manure, it is rich with nitrogen and other elements necessary for plant growth and resilience which serves as a natural way to increase vigor in your garden.
The Best Worms for The Job
Not all worms are created equal when it comes to composting efficiency. You want to make sure you purchase RED WIGGLERS, as these tend to be the most robust and have the best success rate in compost quality. There are several places locally you can find worms locally, including our friends Suzanne and Andrew at Funky Chicken Farm.
Setting Up Your Vermicompost Bin
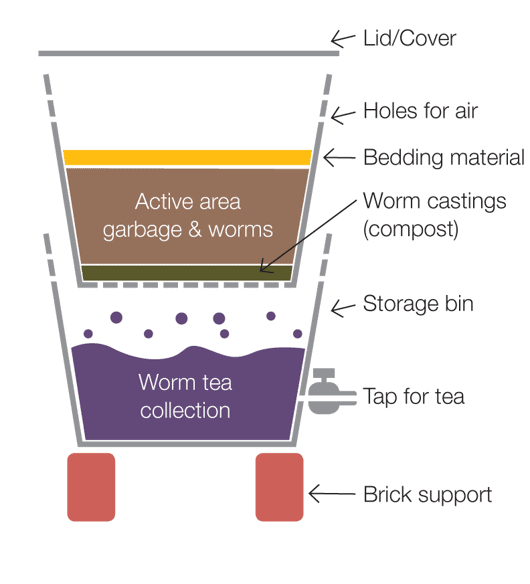
You know those plastic totes they sell at just about every big box store? They happen to make the best affordable homes for housing worms. Just grab a drill (or a hammer with a few nails) to create several holes in the top lids and the bottom of the container.

How to create a vermicompost bin:
1. Set one of your pre-drilled containers on top of 2 bricks (or wooden blocks) with the lid of the container arranged underneath
2. Fill the container with:
- Moistened shredded newspaper
- Food scraps
- 1 lb. of worms!
3. Place a second container of the same size, predrilled, on top of the compost layers and top with lid.
This unique 2 bin system allows ease of separating compost from worms. When the bottom compost is ready, simply start adding scraps and newspaper to the top container, to encourage worms to travel upward through the pre-drilled holes into the new container. Then, you simply move the contents from the bottom to the soon to be happy plants in your garden beds.
Liquid Gold
Remember that bottom lid? That has been diligently collecting run-off from the bottom container, which is a nutritional powerhouse. Also known as compost tea, the liquid portion of your compost is just as valuable as its solid counterpart. It gets its name from its brown tea-like coloration and is a great natural nutrition boost when poured over your thirsty plants. When the tray is full, simply transfer to another container or apply directly to your garden beds.
Worm Bin Dos and Don’ts:
Do:
- Include food scraps, including seaweed, oyster shells, and eggshells
- Toss in natural fibers, such as old cotton t-shirts, socks, yarn, twine, and string
- Add in non-glossy paper products, like cardboard, old junk mail, envelopes
- Recycle coffee grounds, tea leaves, and tea bags (sans staple)
- If you have pets that shed a lot, feel free to add their hair or feathers to the mix
- The lint from your dryer is also compostable, so throw that in, too!
- Keep a top layer of cardboard or sawdust on your compost to cut down on odors
Don’t:
- Include citrus peels, juice, or oils!
- Garlic and onions are also a no go in compost. As a rule, if it makes you smell, it will make your bin smell, too!
- Add in any animal products! This includes bones, oil, butter, and grease.
- Plastic does not degrade well, nor does glossy paper like magazines or stickers.
- Despite intuitive thinking, bread and yeast containing products tend to not be ideal for compost bins, either.
- Throw in any treated wood, animal feces, or infested plants. All of these pose a threat both to your worms and your garden beds.
Tips for Success
- Keep a ratio of roughly 70% browns to 30% greens for odor control and speed of decomposition (see Part 1 of this series for a definition of greens and browns)
- Freeze your food scraps for 24 hours prior to adding to the bin. This trick will reduce the likelihood of fruit flies (who are smell oriented) from laying eggs in your compost.
- Worms, like us, need air circulation. Make sure you aerate your compost by turning it in the bin once a week.
- It is possible to overfeed the worms! If it seems like they are taking longer than usual to break down food, they might be overwhelmed. Cut back on your additions to the pile and you should start seeing the scrap pile going down.


